Showing posts with label windows xp. Show all posts

Bypass 140 Character Limit in Twitter

Twitter is an awesome tool which increases your site reader but one thing which I don’t like about Twitter is that it has a 140 characters limit. So using this loop-hole of Twitter another site called PageTweet , will help you out to bypass 140 character limit. What it actually does is make you enter your message along with your url and nickname and then gives you a short url for that message. You can actually add the shortened url in your Twitter feed along with some another message.

How is this different from other url shortening services?
After reading the above lines, this would be the first question that generates in your mind. The url shortening services may help you to shorten your url but the url which this site will provides will make your viewers to your targeted site, which now has a PageTweet bar along the top that displays the message that you have typed in PageTweet site. It also shows a mini hit-counter for your shortened URL. Below is the example how this happens.
2009-05-09_191158

Read Users' Comments (0)

Get Windows 7 in you Windows XP

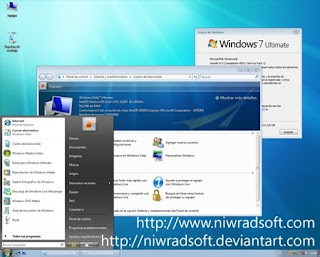
After monotony of default Windows XP/ Windows Theme, it is the time to change yourself and try something new. After windows 7 beta has been released, its time to try the latest Windows Looks and Feels. So just grab the latest Windows 7 Theme (Transformation Pack) which will give a fresh look to your computer.

Seven Remix is a completely free transformation pack which lets you enjoy the look and feel of windows 7 very easily. Seven Remix transformation pack is designed by niwradsoft
Seven Remix transformation pack is made to work on following versions of windows vista, Windows Vista (all editions, SP1), Windows 2008 (all editions, SP1), All Language Versions
Note: This transformation pack is not supported on 64-bit versions of Windows Vista or Windows XP.
Link:- Download Seven Remix Transformation Pack For Windows Vista

Read Users' Comments (0)

React OS – Alternative to Windows

I am using windows operating system for last decade and also sometime install Linux based distributions for testing purposes, this time I’ve found something really amazing to test operating system on my PC, and this amazing thing is React OS. It is Windows NT based open-source operating system, which supports Windows binary (exe) to run in it.reactos_cdcover

React OS is still under heavy development and is in alpha stage of development. The developers itself recommend not to use for daily purposes, till some more improvements are made; but if you are a computer geek and love to try out different OS, then you may give it a try. You can download React OS by various means-

  • Download React OS as Installation CD, Live CD
  • You can also run it virtualized using VMware virtual machine or QMenu
  • You can also get the source code of React OS

You can get to downloads page of React OS at here.

Read Users' Comments (0)

offline browser-HT Track

HTTrack is a free (GPL, libre/free software) and easy-to-use offline browser utility.

It allows you to download a World Wide Web site from the Internet to a local directory, building recursively all directories, getting HTML, images, and other files from the server to your computer. HTTrack arranges the original site's relative link-structure. Simply open a page of the "mirrored" website in your browser, and you can browse the site from link to link, as if you were viewing it online. HTTrack can also update an existing mirrored site, and resume interrupted downloads. HTTrack is fully configurable, and has an integrated help system.

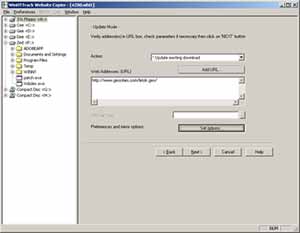
WinHTTrack is the Windows 9x/XP/Vista release of HTTrack, and WebHTTrack the Linux/Unix/BSD release. See thedownload page.Screenshot of Windows GUI

Read Users' Comments (0)

Prevent Cut – Copy – Paste – Delete – Renaming of Files and Folders


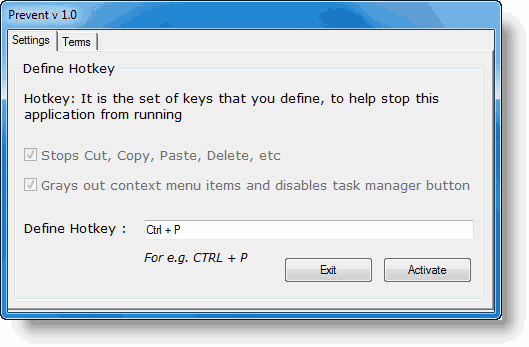
If you don’t want others to use your computer, copy data and modify your files and folders, Try Prevent. It is a freeware app which prevents others from copying anything from your computer along with blocking access to cut, copy, paste, rename or delete files and folders.

You can download and install Prevent. You can use your own keyboard shortcuts to stop the application. If you want to activate Prevent, Just start the application and it prevents any unauthorized modifications. You can stop this application to get all the functions to work normally.


Here is the list of functions Prevent can be used for,

  • Prevent Cut – Copy – Paste – Delete – Renaming of Files and Folders

    Stops Cut

  • Stops Paste

  • Stops Copy

  • Stops Delete

  • Stops Copy To

  • Stops Move to

  • Stops Send To

  • Prevents renaming

  • Disables Task Manager’s End Process button.

  • It even prevents you to right click on process name and click on end process. It also grays out the context menu items, disable Ctrl+C, Ctrl+X and Ctrl+V and/or stops the process.

Get this handy application from this link.

Read Users' Comments (0)

drive letter limits

Actually, it goes into config.sys.

Type at the DOS prompt:
CD\
EDIT CONFIG.SYS

at the end of the lines of commands, in about the same order, you can put:
LASTDRIVE=Z

From there, press the Alt key, press enter,

highlight save, and do so. Then exit.
That should do it.

LASTDRIVE=Z equals to LASTDRIVE=26

LASTDRIVE=32 is the max

what would be the names of drives 27 to 32?

Drive 1: A:
Drive 2: B:
...
Drive 25: Y:
Drive 26: Z:
Drive 27: [:
Drive 28: \:
Drive 29: ]:
Drive 30: ^:
Drive 31: _:
Drive 32: `:

Note: This only works in DR-DOS 7+ & MS-DOS 7+.

There are other options; one of these is to follow the How to create and manipulate NTFS junction points knowledge base article at http://support.microsoft.com/?kbid=205524

There is some additional information as to why this limit exists in an article on the Techtarget website http://searchstorage.techtarget.com/...tml?bucket=ETA

If you actually have more than 26 drives or volumes, you can mount a letterless drive/volume to an empty folder on another drive/volume. This is done through Disk Management.


Read Users' Comments (0)

Defrag pagefile and registry in Windows XP

If you’re run the default Defragmenter program in Windows recently, you may have not realized that the program cannot defrag any file that is currently open, which includes all system files, the Windows page file, and the Windows registry.

However, if you truly want to optimize the speed and performance of your computer, defragging those three aspects of the operating system are the most important! If you think about it, the system files, the page file and the registry are constantly being accessed by Windows in order to complete any task.

So if Windows does not allow you to defrag these areas, then how do you go about doing it? Well, Microsoft has a free product called PageDefrag that will defrag your computer during the system boot up so as to avoid any files being locked up by Windows.


The program will even defrag your event logs! The list shows how fragmented the paging file is and all of the various registry hives (SAM, Software, System, etc).

Choose Defragment at next boot and then restart your computer. First CHKDSK will make sure there are no errors on your hard drive and then the defragment process will begin.


Overall, the program is very useful for increasing the smoothness and speed of your computer. I would recommended only running it once every month or two, not on every boot. Too much defragmenting can actually cause more problems.

There are also other freeware applications that do a great job of defragmenting your hard drive, such as SmartDefrag, a tool that lets you defrag multiple drives at once.

Read Users' Comments (0)

aTunes - Free audio player and music manager

aTunes is one of the free audio players out there with decent music capabilities .

aTunes defines itself as full featured audio player and organizer . It has a cool looking interface with three different columns. The left most column is where you can browse and select songs to play, the middle is your playlist and audio player while the right most column shows you the the extra details on what’s being played.


Once aTunes is installed, it will ask you to add music folders that you want to be added to its repository/library. To make things much simpler, you can select “My Computer” to instruct aTunes to automatically find and index all of the music files inside your hard disk.

aTunes Features

  • Intuitive, three column “Navigator” interface makes it easy to quickly access music files by categories.
  • Drag and drop support between Windows Explorer and aTunes.
  • Supports for various music formats including mp3, ogg, wav, wma, flac, mp4 with karaoke function and on-screen display of song titles.
  • Able to play online radio - comes with a few default internet radio stations.

atunes-internet-radio-support

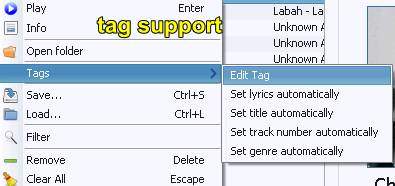
  • Manual and automatic tagging support - read and writes tags for these audio formats: mp3, ogg, mp3, wma, ra, rm. You can also search for music files using specific tags.

atunes-tag-support

  • Able to display pictures inside ID3v3 tag format.
  • Filter support for quick, accurate music file search.
  • Able to cater multiple playlist at one time with thousands of songs each.
  • Able to save and open m3u based playlist format.
  • Portable device support - open, save and sync music files between your audio players and aTunes seamlessly.
  • Favorites - mark your favorite tunes to find and play it quickly later in the future.
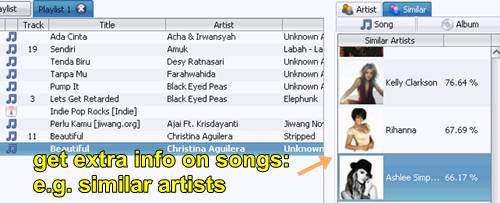
  • AudioCobbler - get similar artist / other tracks / album cover from the web based on current songs played in aTunes.

atunes-extra-details-from-web

  • Last.fm integration - automatic update of your Last.fm profile with songs played in aTunes.
  • Search video for songs being played in Youtube or other video sites.
  • Podcast support - subscribe, download and play audio podcast directly into aTunes.
  • CD ripper tool via Tools -> Import CD function.
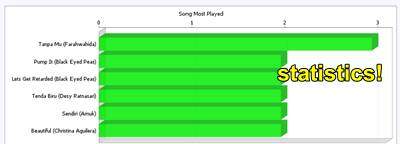
  • statistics tells you about your listening habits based on songs played, songs that never played, most played songs, most played artist and more.

atunes-song-statistics

  • Can be minimized to system tray or viewed full screen.

Read Users' Comments (0)

hide files in JPEG pictures

Hide File in Picture

In order to accomplish this task, you will need to have either WinZip or WinRAR installed on your computer. You can download either of these two off the Internet and use them without having to pay anything. Here are the steps for creating your hidden stash:

  • Create a folder on your hard drive, i.e. C:\Test and put in all of the files that you want to hide into that folder. Also, place the image that you will be using to hide the files in.

hide file in jpg

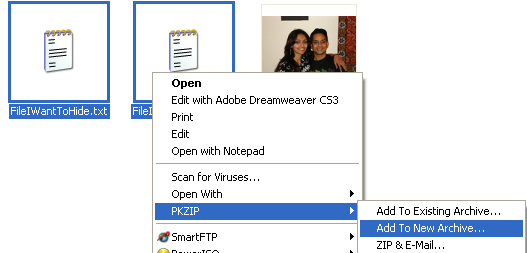
  • Now select all of the files that you want to hide, right-click on them, and choose the option to add them to a compressed ZIP or RAR file. Only select the files you want to hide, not the picture. Name it whatever you want, i,e. “Hidden.rar”.

add to archive

  • Now you should have a folder that looks something like this with files, a JPG image, and a compressed archive:

hidden rar

  • Now here’s the fun part! Click on Start, and then click on Run. Type in “CMD” without the quotes and press Enter. You should now see the command prompt window open. Type in “CD \” to get to the root directory. Then type CD and the directory name that you created, i.e. “CD Test“.

cd test

  • Now type in the following line: “copy /b DSC06578.JPG + Hidden.rar DSC06578.jpg” and press Enter. Do not use the quotes. You should get a response like below:

hide files in jpg

Just make sure that you check the file extension on the compressed file, whether it is .ZIP or .RAR as you have to type out the entire file name with extension in the command. I have heard that some people say that they have had problems doing this with a .ZIP extension, so if that doesn’t work, make sure to compress to a .RAR file.

And that’s it! The picture file will have been updated with the compressed archive inside! You can actually check the file size of the picture and see that it has increased by the same amount as the size of the archive.

You can access your hidden file in two ways. Firstly, simply change the extension to .RAR and open the file using WinRAR. Secondly, you can just right-click on the JPG image and choose Open With and then scroll down to WinRAR. Either way, you’ll see your hidden files show up that you can then extract out.

winrar

That’s it!

Read Users' Comments (0)

Use Animoto to create your own professional looking music videos and movie trailers

Using Animoto, you upload your pictures, choose your music, and using it’s advanced Cinematic Artificial Intelligence technology, the program will produce a fully customized composition of your images and music in widescreen format that has the visual appearance and energy of a music video and movie trailer. Here’s the video I created in 8 minutes!

The technology analyzes your photos and music and combines them with the same techniques and skills used in the film and television industries. The service is very cool because it takes into account every aspect of a song including the genre, song structure, rhythm, vocals, instrumentation, and much more. So if you pick an alternative rock song for your video, you can expect that it’ll be fast-moving, shaky, etc.

Another really cool feature is that you can share the videos via email, embed them into your blog or web site, or post them onto your social networking site of choice, such as MySpace and FaceBook. Creating a video takes just a few minutes because all you have to do is choose the images and pick the music, everything else is taken care of by Animoto. Each video is a full 24 frames per second, so you can be assured the quality is good whether you play it on the computer or on a TV. Anyone can create a 30 second video for free as many times as they like. If you want to crate a full-length video (longer than 30 seconds), you can buy credits.

Also, it’s even easier to create a video if you pictures are stored on an online photo management site. Animoto can connect to Picasa, Flickr, FaceBook, Smugmug, and Photobucket to retrieve images! The max size for a photo is 1MB, so if you have high resolution photos, you will need to reduce them in size first.

To get started, click Create Video at the top left and register on the site. Next, choose whether you wan to create a Animoto Short or Full-Length video.

Next, choose whether you want to upload pictures or retrieve from another site as mentioned above. I use Picasa Web Albums, so I chose to grab them from there. Simply grant access to the service and your pictures show up in Animoto. Painless!

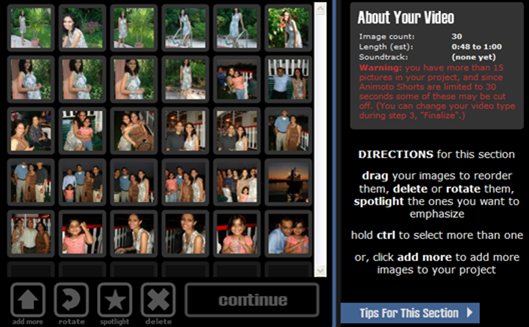
Next, go through your images and rotate them, delete them, or spotlight them. Spotlighting a photo means you want to give it more emphasis in the video than others. You can spotlight as many photos as you like. A free video will only require about 15 to 20 images, otherwise it’ll be considered full-length.

Next you need to choose your music. You can either upload from your computer or choose from their online collection. They only have three genres as of now, Indie Rock, Electronica, and Hip Hop. Finally, give your video a title, description, producer name, etc.

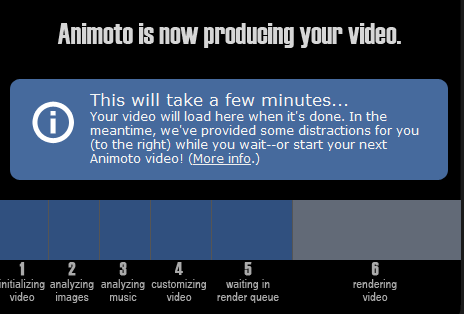
Click Create Video to make your personalized music/movie video. It takes about 5 to 10 minutes to create it, so be patient. Luckily, they have a nice progress bar by which you can watch what is happening:

That’s it!

Read Users' Comments (0)

Edit right click

Edit right click menu for files

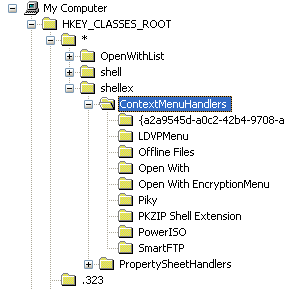
There is a right-click menu for files and another for folders. To get to the one for files, head over to this registry key:

HKEY_CLASSES_ROOT\*\shellex\ContextMenuHandlers\

You should now see a listing like this:

customize right click menu

All the folders listed under ContextMenuHandlers are applications that show up when you right click on a file in Windows. You can either delete the folder to remove the option or simply disable the folder, which is better in case you want to bring it back later on.

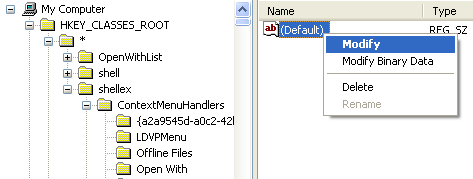
You can disable an application by clicking on the folder in the left pane and then right-clicking on the key value in the right pane and choosing “Modify“.

modify key

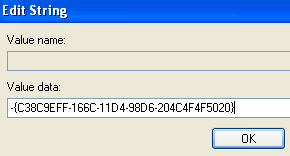
All you need to do is add a minus (-) in front of the key value like shown below:

edit registry

Click OK, then the refresh button at the top and then try right-clicking on the file! The program should now be gone from the context menu.

Edit right click menu for Folders

You can follow the same steps as shown above for folders also, it’s just a different registry path. In order to edit the menu options for right clicking on folders, go here:

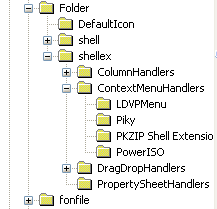
HKEY_CLASSES_ROOT\Folder\shellex\ContextMenuHandlers\

You’ll have to scroll quite a bit, but once you get there, it should look something like this:

edit right click menu

Again, you can either delete the folders under ContextMenuHandlers or you can simplt disable them by editing the key and putting a - in front of the value.

Read Users' Comments (0)

create windows XP live CD

A live CD or live distro is a computer operating system that is executed upon boot, without installation to a hard disk drive.


It just involves adding of some plugins. One of the easiest ways to do this is using a software called pebuilder. Using it, you can create an XP
Live CD
.
Here’s all the software you’ll need:

Thw XP live CD can be created by the following steps:

Step 1: Download pebuilder3110a1.exe and install it.

Step 2: For the wallpaper, replace C:\pebuilder3110a\bartpe.bmp with the image you want as your wallpaper. You can
find the default XP wallpaper at C:\WINDOWS\Web\Wallpaper\bliss.bmp.
(Both these, of course, assume the C drive as the installation location.)

Step 3: Download the plugins:

  • xpe-1.0.7.cab: This will create the XP start button and taskbar. It is the GUI shell of the XP Live CD.
  • Network Driver Plugin Pack: This provides many network card drivers
  • FreeAV Virus Scanner: This integrates FreeAV
  • diskexplorer_for_ntfs.cab: A very good file explorer And more you can choose what you want to download to add functionality. There are 537 plugins right now to choose from!

Step 4: Open pebuilder. Specify the source path to the Windows installation file. This should be your Windows XP installation bootable CD, where the i386 folder resides.

Step 5: Click Plugins and add the plugins you’ve downloaded. Since you’ve included xpe-1.0.7.cab, disable nu2shell and the startup group.

Step 6: Specify the ISO image file, and click Build.

xp live cd

Step 7: After that’s done, use Nero (or any other burning software) and burn the image file to a CD. You’re done!


source:pcs place

Read Users' Comments (0)

peter guttman method of deleting files(35 passes)

Securely deleting files and wiping your HDD

You have multiple files that you decide you want to get rid of. So, you right-click and select 'Delete' and then it's gone, right? Wrong. This is because files on your computer are accessed through a file allocation table, which tells the operating system where in your disk a file can be found. These are marked on the file allocation table by it's identifier. When you delete a file you are not really deleting it off your computer, but are instead simply removing it's entry on the file allocation table so that the computer can no longer access it.


The process securely removing information happens when you can remove it and write it over with bits of random data multiple times. However, it is difficult for the average uneducated computer user to differentiate between how many is not enough.

7 passes is the national standard for the U.S. government.

8 passes is the national standard for Canada's government.

Britian's national standard for overwritting files is 38.

The Gutman Method just not only overwrites data with 35 passes, but it does much more than that.There are a number of applications you can use to securely erase files, and yes, even your entire hard drive. The best option to erase files is a nice program called "Window Washer". With Window Washer you can select between
Quick method(1 pass), DoD(7 passes), NSA(14 passes), Gutman(35 passes), and Random(you select your own number of passes manually). Window Washer also gives you the option of creating a bootable disk to wipe your HDD with the same methods listed above. However, I highly highly recommend something called "Darik's Boot and Nuke" or DBAN. This is a boot disk that gives you the passes mentioned above, while giving you different methods of magnetic wiping methods.

Read Users' Comments (0)

svchost.exe

svchost.exe is a system process belonging to the Microsoft Windows Operating System which handles processes executed from DLLs. This program is important for the stable and secure running of your computer and should not be terminated.

Note: svchost.exe is a process registered as a backdoor vulnerability which may be installed for malicious purposes by an attacker allowing access to your computer from remote locations, stealing passwords, Internet banking and personal data. If unaccounted for, this process should be removed immediately.

Note: svchost.exe is a process which is registered as a trojan. This Trojan allows attackers to access your computer from remote locations, stealing passwords, Internet banking and personal data. This process is a security risk and should be removed from your system.

Note: svchost.exe is a process belonging to Microsoft Service Host Process. This could also be a stealth monitoring software that sits in the background and tracks all activities such as keyboard input (including websites visited, passwords etc.) This information can be sent to third parties through email or ftp uploads. If you did not intentionally install this program make sure you remove it to protect your privacy.


Determining whether svchost.exe is a virus or a legitimate Windows process depends on the directory location it executes or runs from.

It is strongly recommend that to run registry scan to identify svchost.exe related errors.

Read Users' Comments (0)

free PDF to WORD converter software

Read Users' Comments (0)

CTFMON.EXE

What is CTFMON.EXE

If you have opened the Windows Task Manager or used Hijackthis to track down a problem, you have probably run across a file called CTFMON.EXE. Disabling it from MSCONFIG doesn't make it go away and it definitely feels like a virus, so what exactly is this file?

It turns out that CTFMON.EXE is a file that is installed with Office XP applications. It activates the Alternative User Input Text Input Processor and the Language Bar. The program monitors the active windows and provides text input service support for speech recognition, handwriting recognition, keyboard, translation, and other alternative user input technologies. It also starts the language bar that appears next to the system tray (shown below).


A Hijackthis log will show CTFMON in this way

O4 - HKCU\..\Run: [ctfmon.exe] C:\WINDOWS\system32\ctfmon.exe


How to Disable the Language Bar and Remove CTFMON.EXE

Follow the directions below to disable the Advanced Text Services to remove the Language Bar

1) Open the Control Panel
2) Double-click on Regional and Language Options (if you are in Classic View) Regional and Language
or Double-click on Date, Time, Language, and Regional Options in Category View
Date, Time, Language, and Regional Options

3) Click on the Languages tab, then click on Details

Languages Tab

5) Click on the Advanced Tab
6) Finally, place a checkmark in the box "Turn off advanced text services" and Click Ok

Advanced Text Services

The language bar next to the System Tray should disappear, and CTFMON.EXE will unload from memory.

If you wish to bring back the language bar, simply follow the procedure above and UNCHECK the box to turn off advanced text services.

Microsoft has more information and a Frequently Asked Questions document about CTFMON.EXE, click on the link below to review it.


Therefore, CTFMON.EXE is not a virus or a piece of malware, but its also not a program that you NEED running, expecially if you don't use Microsoft Office XP applications.

Read Users' Comments (0)

error beeps

1 short beep

Normal POST - system is ok
2 short beeps POST Error - error code shown on screen
No beep Power supply or system board problem
Continuous beep Power supply, system board, or keyboard problem
Repeating short beeps Power supply or system board problem
1 long, 1 short beep System board problem
1 long, 2 short beeps Display adapter problem (MDA, CGA)
1 long, 3 short beeps Enhanced Graphics Adapter (EGA)
3 long beeps 3270 keyboard card

Read Users' Comments (0)

Run Commands In Windows XP

You can access all these programs by going through START/RUN or Simply Click Windows Key+r


  1. SQL Client Configuration - cliconfg

  2. System Configuration Editor - sysedit

  3. System Configuration Utility - msconfig

  4. System File Checker Utility (Scan Immediately)- sfc /scannow

  5. System File Checker Utility (Scan Once At Next Boot)- sfc /scanonce

  6. System File Checker Utility (Scan On Every Boot) - sfc /scanboot

  7. System File Checker Utility (Return to Default Setting)- sfc /revert

  8. System File Checker Utility (Purge File Cache)- sfc /purgecache

  9. System File Checker Utility (Set Cache Size to size x)-sfc/cachesize=x

  10. System Information - msinfo32.

  11. Task Manager – taskmgr

  12. System Properties - sysdm.cpl

  13. Task Manager – taskmgr

  14. TCP Tester - tcptest

  15. Telnet Client - telnet

  16. Tweak UI (if installed) - tweakui

  17. User Account Management- nusrmgr.cpl

  18. Utility Manager - utilman

  19. Windows Address Book - wab

  20. Windows Address Book Import Utility - wabmig

  21. Windows Backup Utility (if installed)- ntbackup

  22. Windows Explorer - explorer

  23. Windows Firewall- firewall.cpl

  24. Windows Magnifier- magnify

  25. Windows Management Infrastructure - wmimgmt.msc

  26. Windows Media Player - wmplayer

  27. Windows Messenger - msmsgs

  28. Windows Picture Import Wizard (need camera connected)- wiaacmgr

  29. Windows System Security Tool – syskey

  30. Windows Update Launches - wupdmgr

  31. Windows Version (to show which version of windows)- winver

  32. Windows XP Tour Wizard - tourstart

  33. Wordpad - write

  34. Password Properties - password.cpl

  35. Performance Monitor - perfmon.msc

  36. Phone and Modem Options - telephon.cpl

  37. Phone Dialer - dialer

  38. Pinball Game - pinball

  39. Power Configuration - powercfg.cpl

  40. Printers and Faxes - control printers

  41. Printers Folder – printers

  42. Private Character Editor - eudcedit

  43. Quicktime (If Installed)- QuickTime.cpl

  44. Real Player (if installed)- realplay

  45. Regional Settings - intl.cpl

  46. Registry Editor - regedit

  47. Registry Editor - regedit32

  48. Remote Access Phonebook - rasphone

  49. Remote Desktop - mstsc

  50. Removable Storage - ntmsmgr.msc

  51. Removable Storage Operator Requests - ntmsoprq.msc

  52. Resultant Set of Policy (XP Prof) - rsop.msc

  53. Scanners and Cameras - sticpl.cpl

  54. Scheduled Tasks - control schedtasks

  55. Security Center - wscui.cpl

  56. Services - services.msc

  57. Shared Folders - fsmgmt.msc

  58. Shuts Down Windows - shutdown

  59. Sounds and Audio - mmsys.cpl

  60. Spider Solitare Card Game - spider

  61. Malicious Software Removal Tool - mrt

  62. Microsoft Access (if installed) - access.cpl

  63. Microsoft Chat - winchat

  64. Microsoft Excel (if installed) - excel

  65. Microsoft Frontpage (if installed)- frontpg

  66. Microsoft Movie Maker - moviemk

  67. Microsoft Paint - mspaint

  68. Microsoft Powerpoint (if installed)- powerpnt

  69. Microsoft Word (if installed)- winword

  70. Microsoft Syncronization Tool - mobsync

  71. Minesweeper Game - winmine

  72. Mouse Properties - control mouse

  73. Mouse Properties - main.cpl

  74. Nero (if installed)- nero

  75. Netmeeting - conf

  76. Network Connections - control netconnections

  77. Network Connections - ncpa.cpl

  78. Network Setup Wizard - netsetup.cpl

  79. Notepad - notepad

  80. Nview Desktop Manager (If Installed)- nvtuicpl.cpl

  81. Object Packager - packager

  82. ODBC Data Source Administrator- odbccp32.cpl

  83. On Screen Keyboard - osk

  84. Opens AC3 Filter (If Installed) - ac3filter.cpl

  85. Outlook Express - msimn

  86. Paint – pbrush

  87. Keyboard Properties - control keyboard

  88. IP Configuration (Display Connection Configuration) - ipconfi/all

  89. IP Configuration (Display DNS Cache Contents)- ipconfig /displaydns

  90. IP Configuration (Delete DNS Cache Contents)- ipconfig /flushdns

  91. IP Configuration (Release All Connections)- ipconfig /release

  92. IP Configuration (Renew All Connections)- ipconfig /renew

  93. IP Configuration(RefreshesDHCP&Re-RegistersDNS)-ipconfig/registerdns

  94. IP Configuration (Display DHCP Class ID)- ipconfig/showclassid

  95. IP Configuration (Modifies DHCP Class ID)- ipconfig /setclassid

  96. Java Control Panel (If Installed)- jpicpl32.cpl

  97. Java Control Panel (If Installed)- javaws

  98. Local Security Settings - secpol.msc

  99. Local Users and Groups - lusrmgr.msc

  100. Logs You Out Of Windows - logoff.....

  101. Accessibility Controls - access.cpl

  102. Accessibility Wizard - accwiz

  103. Add Hardware - Wizardhdwwiz.cpl

  104. Add/Remove Programs - appwiz.cpl

  105. Administrative Tools control - admintools

  106. Adobe Acrobat (if installed) - acrobat

  107. Adobe Designer (if installed)- acrodist

  108. Adobe Distiller (if installed)- acrodist

  109. Adobe ImageReady (if installed)- imageready

  110. Adobe Photoshop (if installed)- photoshop

  111. Automatic Updates - wuaucpl.cpl

  112. Bluetooth Transfer Wizard – fsquirt

  113. Calculator - calc

  114. Certificate Manager - certmgr.msc

  115. Character Map - charmap

  116. Check Disk Utility - chkdsk

  117. Clipboard Viewer - clipbrd

  118. Command Prompt - cmd

  119. Component Services - dcomcnfg

  120. Computer Management - compmgmt.msc

  121. Control Panel - control

  122. Date and Time Properties - timedate.cpl

  123. DDE Shares - ddeshare

  124. Device Manager - devmgmt.msc

  125. Direct X Control Panel (If Installed)- directx.cpl

  126. Direct X Troubleshooter- dxdiag

  127. Disk Cleanup Utility- cleanmgr

  128. Disk Defragment- dfrg.msc

  129. Disk Management- diskmgmt.msc

  130. Disk Partition Manager- diskpart

  131. Display Properties- control desktop

  132. Display Properties- desk.cpl

  133. Display Properties (w/Appearance Tab Preselected)- control color

  134. Dr. Watson System Troubleshooting Utility- drwtsn32

  135. Driver Verifier Utility- verifier

  136. Event Viewer- eventvwr.msc

  137. Files and Settings Transfer Tool- migwiz

  138. File Signature Verification Tool- sigverif

  139. Findfast- findfast.cpl

  140. Firefox (if installed)- firefox

  141. Folders Properties- control folders

  142. Fonts- control fonts

  143. Fonts Folder- fonts

  144. Free Cell Card Game- freecell

  145. Game Controllers- joy.cpl

  146. Group Policy Editor (XP Prof)- gpedit.msc

  147. Hearts Card Game- mshearts

  148. Help and Support- helpctr

  149. HyperTerminal- hypertrm

  150. Iexpress Wizard- iexpress

  151. Indexing Service- ciadv.msc

  152. Internet Connection Wizard- icwconn1

  153. Internet Explorer- iexplore

  154. Internet Setup Wizard- inetwiz

  155. Internet Properties- inetcpl.cpl
Read Users' Comments (0)

MAKE YOUR MENUS LOAD FASTER

This is one of my favorite tweaks as it makes a huge difference to how fast your machine will 'feel'. What this tweak does is remove the slight delay between clicking on a menu and XP displaying the menu.


Go to Start then Run
Type 'Regedit' then click 'Ok'
Find "HKEY_CURRENT_USER\Control Panel\Desktop\"
Select "MenuShowDelay"
Right click and select "Modify'
Reduce the number to around "100"
This is the delay time before a menu is opened. You can set it to "0" but it can make windows really hard to use as menus will open if you just look at them - well move your mouse over them anyway. I tend to go for anywhere between 50-150 depending on my mood.


Read Users' Comments (0)

convert FAT to NTFS

To convert a FAT partition to NTFS, perform the following steps.

Click Start, click Programs, and then click Command Prompt. In Windows XP, click Start, click Run, type cmd and then click OK.

At the command prompt, type CONVERT [driveletter]: /FS:NTFS. Convert.exe will attempt to convert the partition to NTFS.

Read Users' Comments (0)